In literature, my children have seemingly simultaneously entered into the unit on story mapping. It’s been a reoccurring topic in my 4th graders series of “180 Days of Reading grade 4” and for my 7th grader it has been a topic in “Curtis and Hake Grammar”. So anyway, having 8 children it is imperative that I combine what I can between my students in order to maximize the content we can cover without putting a heavy burden on our time. Literature is the perfect topic to integrate your lesson-planning because a lot of the content is covering the same topic but merely with advancements in vocabulary and depth. It leaves you some room to navigate. Because you will notice as a parent that there are some children that will absorb any content you give them, and the advanced vocabulary and deeper concepts don’t hinder them in the least. Likewise, there are students that you will see may repeatedly need revision on the same topics to build mastery. So bringing these children together will kill two birds with one stone.

We started this story mapping protect a week ago and I’ve designed it to be a one month project by selecting a sixteen chapter book. We will be covering two chapters per lesson, twice a week. I have strategically chosen a 4th-grade level reading book “Jack Stalwart and The Mission to Find Max” in order to maximize what my children can take from the content. I have incorporated mini whiteboards (laminated white paper) beneath literary concepts that will be documented as we read through the story.
I did this for two reasons:
One: the fourth-grade students will find it easy to follow along and therefore leaving room to orientate themselves with the new vocabulary and pick up some of the advanced terminologies that were included to maintain grade level for my 7th grader.
Two: by selecting a book beneath my sons reading level I was able to put a heavy focus on incorporating all of the literary concepts and terminologies that I wanted him to develop an understanding of and master in this unit.
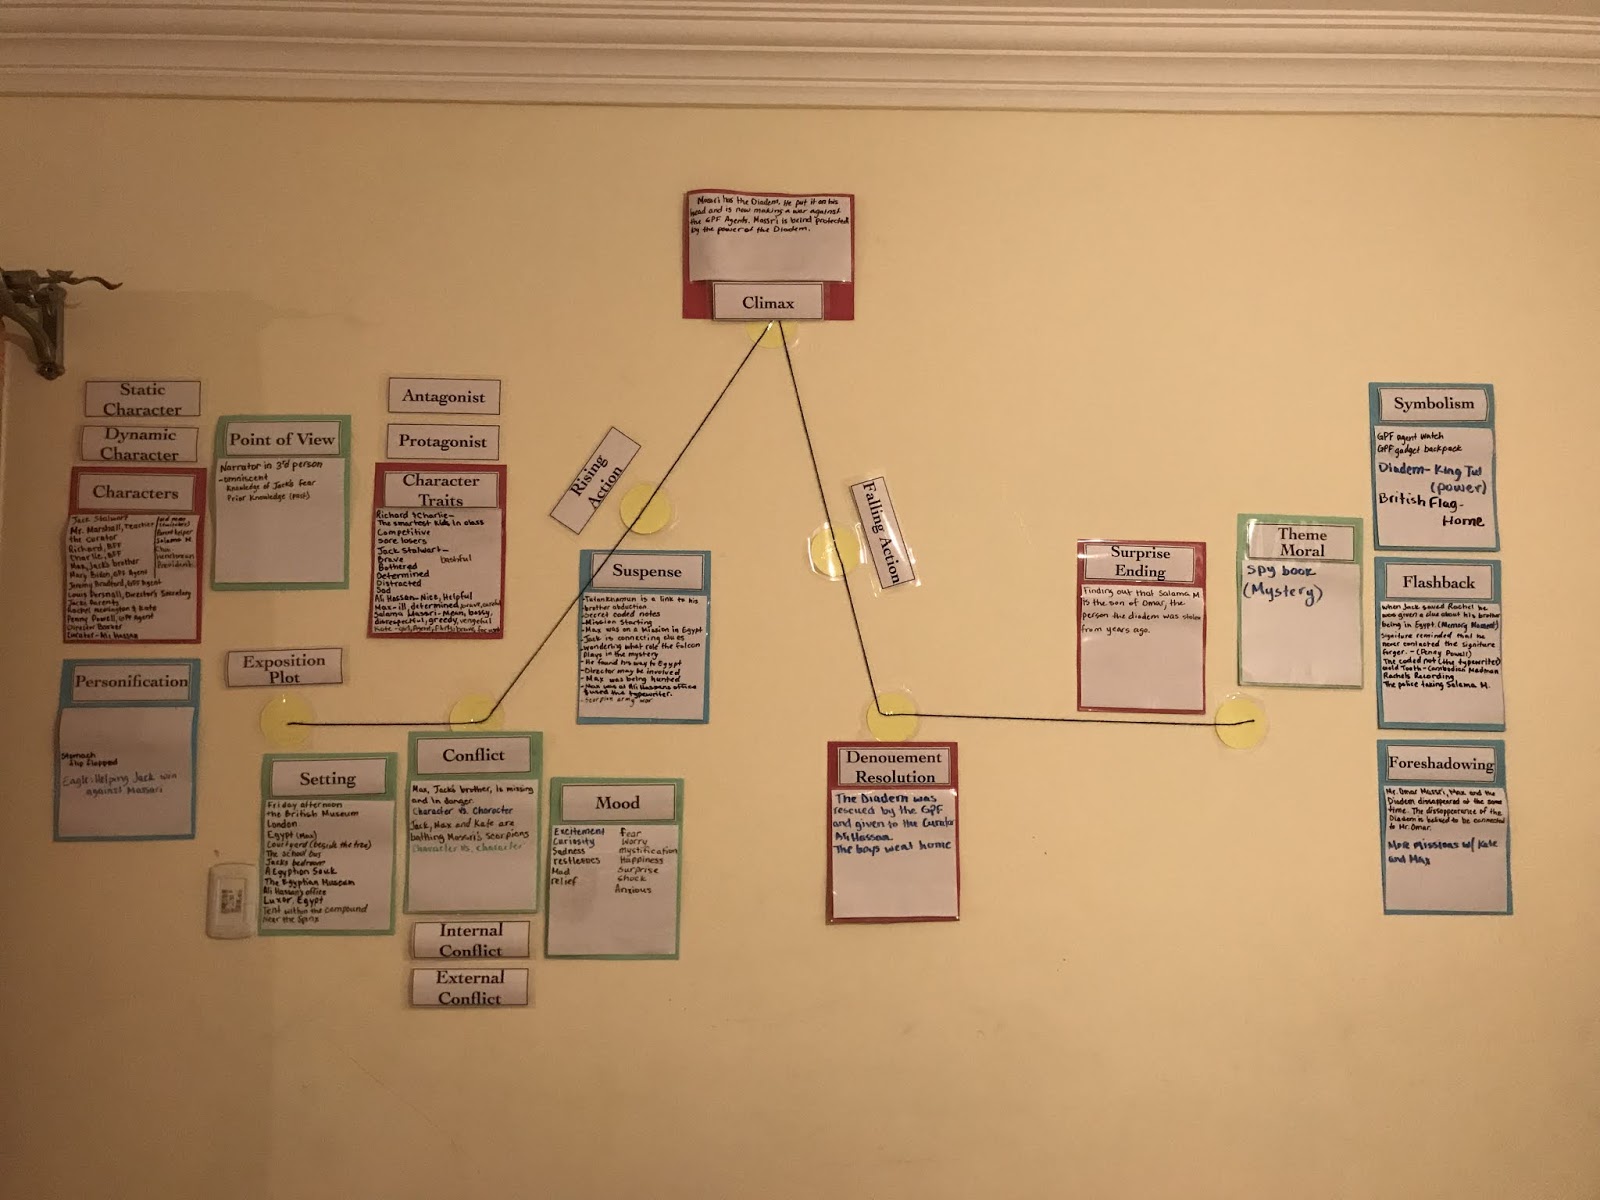
I will include a file of the vocabulary terms and concepts for the unit, as well as a photo of how we created the story mapping wall.
Classroom Story Mapping Board.
Tools:
There are several designs that could represent the story mapping diagram that you will model with the yarn and parchment circles. We kept ours very basic in order to give a basic visual to the third graders.
How:
First, I laminated the vocab/topic cards and the 'dry-erase board' separately... but in hindsight, I should have mounted the vocabulary term to the top of the white paper and laminated the whole sheet to be used as our dry erase board and header display simultaneously. I made one of these for each of the parts of my story plot and also for any other literary concepts that I wanted to cover as we read.

I used laminated circles cut from card stock to represent the different points on our story plot. I placed the dots in the shape that I was going to recreate with the yarn and then taped the yarn to each of the dots as I created the plot diagram shape. After the diagram was on the wall I placed the terms and their boars onto the plot beside its respective place. Any additional literary terms, I attempted to add them to the places that they would most suitably be discovered along the storyline. Any concepts or terms that were left and did not have an obvious place on the storyline were placed at the end of the plot. Also, I combined some elementary terms and seventh-grade terms on the same cards, in order to make a better connection to the new vocabulary.
To keep the project fun and focused on the literary elements, I have chosen to make this like a story time, where I read it to my children. It keeps the project fast and fun, and my children like my sound effects and animated voices lol. However, if you want to add the element of reading and/or writing, you can have your child read and/or document the information onto the plot himself. This is really a great project and I know they will love it. Remember, keep it fun mom! <3
The Laminated papers can be written on with any standard dry erase marker and removed just as easily. This project has been the highlight of the week for my children. I hope you give it a try.
We started this story mapping protect a week ago and I’ve designed it to be a one month project by selecting a sixteen chapter book. We will be covering two chapters per lesson, twice a week. I have strategically chosen a 4th-grade level reading book “Jack Stalwart and The Mission to Find Max” in order to maximize what my children can take from the content. I have incorporated mini whiteboards (laminated white paper) beneath literary concepts that will be documented as we read through the story.
I did this for two reasons:
One: the fourth-grade students will find it easy to follow along and therefore leaving room to orientate themselves with the new vocabulary and pick up some of the advanced terminologies that were included to maintain grade level for my 7th grader.
Two: by selecting a book beneath my sons reading level I was able to put a heavy focus on incorporating all of the literary concepts and terminologies that I wanted him to develop an understanding of and master in this unit.
I will include a file of the vocabulary terms and concepts for the unit, as well as a photo of how we created the story mapping wall.
 |
| We laminated the literary concept and taped it to the board. Beneath the term, we laminated a plain piece of paper to create a makeshift dry erase board, that could be erased an added to as our storyline progresses. |
Tools:
- Scissors
- Laminating machine
- Tape or an adhesive gum.
- 8 1/2-10 ft. of Yarn
- 7 - 4” card stock circles
- 15 p. Mounting card stock
- Approx. 20-25 sheets of white printer paper
- Approx. 20-25 laminating sleeves
- Vocabulary plotting labels - grades 4-7
- Your preference for a chapter book for mapping
There are several designs that could represent the story mapping diagram that you will model with the yarn and parchment circles. We kept ours very basic in order to give a basic visual to the third graders.
How:
First, I laminated the vocab/topic cards and the 'dry-erase board' separately... but in hindsight, I should have mounted the vocabulary term to the top of the white paper and laminated the whole sheet to be used as our dry erase board and header display simultaneously. I made one of these for each of the parts of my story plot and also for any other literary concepts that I wanted to cover as we read.

I used laminated circles cut from card stock to represent the different points on our story plot. I placed the dots in the shape that I was going to recreate with the yarn and then taped the yarn to each of the dots as I created the plot diagram shape. After the diagram was on the wall I placed the terms and their boars onto the plot beside its respective place. Any additional literary terms, I attempted to add them to the places that they would most suitably be discovered along the storyline. Any concepts or terms that were left and did not have an obvious place on the storyline were placed at the end of the plot. Also, I combined some elementary terms and seventh-grade terms on the same cards, in order to make a better connection to the new vocabulary.
To keep the project fun and focused on the literary elements, I have chosen to make this like a story time, where I read it to my children. It keeps the project fast and fun, and my children like my sound effects and animated voices lol. However, if you want to add the element of reading and/or writing, you can have your child read and/or document the information onto the plot himself. This is really a great project and I know they will love it. Remember, keep it fun mom! <3
The Laminated papers can be written on with any standard dry erase marker and removed just as easily. This project has been the highlight of the week for my children. I hope you give it a try.
Comments
Post a Comment